Friday, February 20, 2009

Securing Your Beachcat

With today's lightweight cats, like the F16 and A-cats, there is a need to secure your boat to the beach when not sailing. Failure to do so can result in your boat flipping or worse.
I recently read the thread on the Catsailor forums that examined a number of options. The idea is to have an anchor that goes deep enough to hold the boat down (especially if the mast is up), but easy to plant and remove.


One poster there suggested Ace Hardware as a place to buy "auger anchors." I could not find these on the Ace website nor from calling some hardware stores in the Chicago area. It may be that this is more of an item that is only offered regionally.

I did find them at TrueValue hardware's online store for $5.29:


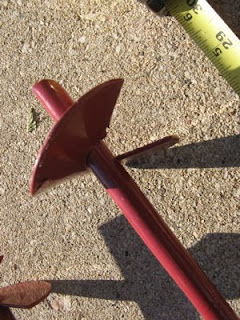
I went into the local TrueValue and bought two for around $6.25 each. They are made of a pretty heavy duty 1/2" rod and the auger at the botton is about 4". They are 30" long. I intend to use a large screwdriver to put through the eye and twist them into the sand.

I also bought two tie down straps with adjustment clamps. I have used these before to secure a canoe to the top of a car and they are the best tie downs I have found. I will update this post once I try them. Here are pictures of the anchors and straps.


Monday, February 16, 2009

Interested in F16??

Here are some F16 Web sites & blogs that provide information about the F16 class.

First of all, here is the international F16 site. Good information about the various types of boats that are currently F16 compliant and a host of pictures.

http://www.formula16.net/

Another site with some background on the Blade F16:

http://www.geocities.com/f16hpclass/F16HP_boat_show_dynautic_blade_F16.html

The F16 Forum on Catsailor.com:

http://www.catsailor.com/forums/ubbthreads.php?ubb=postlist&Board=6&page=1

Here is a good blog on F16 sailing. Its based in Singapore. Lots of tuning information:

http://boatsbikesboards.wordpress.com/2008/10/04/hybrid-blade-second-sail/

And here is the site for the Midwest factory rep. for Falcon Marine (formerly Vectorworks Marine, the US manufacturer of the Blade F16 - and now the Falcon F16):

http://www.windline.net/blade.htm

Favorite Cat Sailing Forums

Here are a few of the cat sailing forums out there that I thought readers might appreciate. There is a lot on these sites to help the novice to the more exeperienced cat sailor. So far, Catsailor is my favorite. A good deal of off-topic stuff, but lots of great information about cat sailing.

Catsailor
http://www.catsailor.com/forums/ubbthreads.php/ubb/cfrm

There are forums for the different types of catamarans. For example, there is a forum just for F16: http://www.catsailor.com/forums/ubbthreads.php?ubb=postlist&Board=6&page=1

Beachcats
http://www.thebeachcats.com/module-forum.html

Sailing Anarchy (specifically Multihull Anarchy)
http://forums.sailinganarchy.com/index.php?s=384dcff904c28ad44ba4a937dcdeee7a&showforum=37

Hobie Cat
http://www.hobiecat.com/community/index.php?sid=cd861536736d36b6f523c2a44dc23a27

CRAW & CRAM Regattas


There are two excellent catamaran racing organizations in the Midwest. CRAW (Catamaran Racing Association of Wisconsin) and CRAM (Catamaran Racing Association of Michigan). Here are their websites:

http://www.crawsailing.org/

http://www.websitemagic.com/cram/

There are at least 20 Regattas currently scheduled for 2009. Click on the table below to see the dates/times/lakes and locations. Also, see the map for locations of the Regattas.
For official information, go to the the CRAW and/or CRAM sites for the notice of race (NOR) and the full dates/times/locations.


Sunday, February 15, 2009

Why I chose F16 / Blade

I thought it might be helpful to someone considering the class to hear how I came at the decision to go F16 and buy my Blade.

My criteria set consisted of buying a performance cat that was a lightweight, single handed, fast boat that was versatile in terms of sail plan. For example, I really wanted to learn to sail a spinnaker. I am more of a recreational sailor than racer, but I also wanted the option to do more racing.

The first boat I looked at was the Hobie 17. There is some presence of this boat in the Midwest where I live and used boats were available at very reasonable prices, but it was primarily the weight that ruled it out. Lugging it around the beach and righting it looked like it would be a pain.

The second boat I looked at was the Hobie FX-One. This is really the boat that got me interested in high performance cat sailing. It had the modern hull design and the ability to sail a jib and a spinnaker, plus it just looked cool. Weight was a factor in not going with this boat, but also, both new and used ones seemed a bit hard to come by. While racing isn’t my highest priority, I couldn’t figure out who they were racing against – at least in the Midwest, anyway. I didn’t see any Regatta pictures that showed an FX-One.

I was e-mailing back and forth with someone who I met on the Hobie Forums and he suggested that I look at the A-cat. Wow, what a cool boat. I liked the idea of a light weight speedster and this was my introduction to open design where as long as you stuck to some basic parameters, the boat could use different materials, etc. Also, there seemed to be some racing of A-cats in the Midwest and a supply of used boats at reasonable prices. But, it was pretty much a racing boat and did not have a spinnaker. Also, it seemed a little too light for my recreational sailing.

I then looked at the Nacra F17. It met nearly all of my criteria, plus there was an active racing community in Wisconsin and Michigan. The weight of the boat put me off a little though, and I personally didn’t like the looks of the boat (nothing personal, F17 sailors).

Then I discovered the F16 site and the Blade. Again, a very cool design like the FX-1 that met all my criteria. I looked into building one, but while I think I was up to it technically, I didn’t have a spare 200+ hours the designer indicated it would take. Then I e-mailed Matt McDonald at Vector Marine. He gently steered me away from the home build and answered my questions about the Blade. He also said he had a used Blade destined for Europe, that wasn’t sent due to the unfavorable exchange rate. A couple of weeks later, I was in Florida on business, so I drove over to Titusville. Matt spent well over an hour with me showing me the production process and showing me a Blade he had rigged up. I was impressed by all the standard features of the boat, how it could be tuned from the wire and the quality of the workmanship. Also, Matt knew the production end, but was a sailor as well. Minor point but I have spent my fair share of time talking to people who don’t know about catamaran sailing (even Hobie dealers). It’s reassuring to buy from somebody that knows what you are talking about. I came home determined to figure out a way to buy it.

Below is a table comparing the various boats I considered (click to make larger). Data was taken off of web pages. I am told the weight for a F17 boat is closer to 300 lbs. Also, boats like the H17 and F17 do have a jib option, but I couldn't find any information about the jib dimensions.

Catamaran Launch Sites - Chicago Area

There are several Lake Michigan catamaran launch sites in the greater Chicago area. This commentary is from a fellow Chicago area catamaran sailor.

Winnetka
This appears to be the best prospect, unless there is some show-stopping aspect that is not yet apparent. It appears that the weekend beach launch fees of $23 daily / $233 season are the 2008 rates, which will probably go up for 2009.

Nevertheless, this appears too good to pass up, if not too good to be true!It appears that the facilities generally wouldn't allow putting the mast up with the boat on the trailer & hitched to the vehicle, due to trees overhanging the road between the parking area and the beach, based on the Google Maps satellite photos. However, that would be an inconvenience, not a show-stopper, and one would have to assess that on-site. http://maps.google.com/maps?sourceid=navclient&ie=UTF-8&rlz=1T4DKUS_enUS269US270&q=Sheridan+Road+and+Lloyd+Place%2c+winnetka%2c+IL+60093

Highland Park
I see that their 2009 weekend beach launch fees have been increased to $70 daily / $334 season / $814 season launch+storage (L< ft, W<=8 ft; would have made exception for W=8.5 to fill spot last year). Unless there is a show-stopper for Winnetka, that appears better.http://www.pdhp.org/dir_docs/docs_directory_library/96e8b077-60f2-46b6-8949-1fc42b8f6a68_documentupload.pdf

North Point Marina, Winthrop Harbor / Illinois Beach State Park
I have not been to this site, but I understood that people launch Lasers & Sunfish by carrying them from the parking lot to the beach, and that one probably could use beach wheels to do the same for catamarans. There would be no fee. A motor would be required to launch from the ramp, which would involve a fee. This is per phone call Sep 2007.

Gary/Miller Beach, Indiana: Lake St. Beach:
This used to be a very good venue, and appeared to still be passable when we stopped by there in Aug 2007. We sailed there alot from 1986 to ~1991, with Hobie Fleet 126 when it was still active, and held a Hobie Regatta there ~1990, but haven't sailed there since.

The beach had been a pleasant are for picnicing & swimming a bit, but the jet skis had ruined that by ~1990. I don't know what the jet ski situation is now; I don't recall seeing any Aug 2007. There is a large parking lot adjacent to the beach, allowing masts to be erected on the trailer and cats to be taken off the trailer onto beach wheels. However, in Aug 2007, the beach had extended out ~150 yards from the lot, with sand dunes built up to maybe 15 ft high, vs. ~50 yards with no dunes ~1990.

Also, sand bars had developed with water depth ~3 ft out another ~100 yards. Two strong people probably could traverse the dune at an angle. Or, one could use the ramp, for which they had dug a channel through the dunes to continue using. With winds from the W, S, or E, the sailing is great. Of course, the waves quickly become very high if the wind has a major northerly component, with the full N-S fetch of Lake Michigan.

Velocitek SpeedPuck


My latest purchase is a Velocitek Speed Puck.

http://velocitek.com/products/speedpuck

This is basically a GPS based speedometer and compass for your sailboat. I bought it primarily to help me tune my sailboats while on the water.

As you can see from the picture, it only has one button that allows you to turn it on and change modes (speed, max speed, heading, etc.). I like the simplicity of this unit as I don't like to screw around with a lot of buttons while on the water.

It also has this neat function that allows you to download your GPS information from your SpeedPuck to your computer and then re-create races, etc. via their SpeedPlay software on your computer (PC only right now).

http://velocitek.com/products/speedplay


I purchased a spinnaker pole mount to put it on my Blade F16 sailboat. See the photos below for how it mounts.

The Speedpuck has this heavy duty velcro on the back called dual lock. After placing a piece of heavy duty velcro on the spinnaker pole mounting bracket, you mate the unit to the bracket.


You might be a little wary of the fact that it uses this velcro-like material called dual lock, but it is pretty tough. I tried to shake it free and gave it some pretty violent shakes. It also comes with a lanyard which I intend to tie to my spinnaker pole.


More to come on this unit...

Wind and Weather

I continue to find sites that publish the weather and wind speeds for various locations in the Midwest.

Below is a link for the National Oceanic and Atmospheric Administration (NOAA) page for Lake Michigan, Lake Erie and Lake Huron. You can click on any city where they have an observation station and get wind speed, tempature, etc.

http://www.glerl.noaa.gov/metdata/

Here is another site called SailFlow that allows you to see current and historical wind speeds for the Great Lakes region. Click on the map and follow the drop down box to your area of interest.

http://www.sailflow.com/windandwhere.iws?regionID=210&regionProductID=29&timeOffset=0


H14 Turbo Conversion

Introduction
With the help of Dan Berger, a veteran catamaran modifier, last summer I converted my 1979 H14 from unirig to a Turbo. Because my boat sits on the beach, Dan suggested I set up my H14 like a H16 without a rolling furler for the jib. This setup allows you to take down the jib after each sail and save a little money on the furler.

Converting your boat to a turbo is not an inexpensive conversion. You can buy a used H14 turbo (if you can find one) for less than the price total shown on the parts list below. To save money, I bought used parts from Dan, eBay and Craig’s list and got the remaining new parts from a good Hobie Cat dealer in Austin. Often, you can get great deals on eBay on the jib, blocks and trampoline, which are the most expensive parts. Overall, I did the project for a little over half of what is shown in the parts list below, but this includes a new jib and a new trampoline that combined cost almost $600. The remaining parts were purchased for less than $320.

The H16 or “Little 16” setup as Dan calls it, requires most of the typical H14 Turbo rigging, except the jib with the jibstay isn’t rigged all the time. Instead there is a separate forestay that supports the weight of the mast when the jib is not being used. To raise and lower the jib, there is a jib halyard setup just like the H16 that attaches to the upper forestay and consists of the jib halyard block, jib halyard wire, shackle, jib halyard line, downhaul block, cheek block and cleat. The cheek block and cleat are attached to the lower mast – again just like the H16.

Please note that this conversion requires some basic mechanical ability and should be undertaken at your own risk. Also, parts numbers shown in the parts list should be verified prior to purchase. Prices shown are from the 08-09 Hobie Cat Parts Catalog.

Let’s start with additions to the H14 trampoline frame that must be completed to allow you to use a jib and trapeze setup.

Dolphin Striker
First of all, you’ll need a dolphin striker. This provides additional support to the frame when you are out on the trapeze. You can bend your front crossbar if you fly a hull or trapeze without it. This is basically a solid post attached underneath your mast step that has a wire (or bar) with threaded post ends that attach using nuts to either corner casting (see picture below). Hobie Cat or Murray’s sells a dolphin striker for the H14 with that only requires 4 rivets and is pretty easy to install.


Installed Dolphin Striker

For the Dolphin Striker installation, you can use the striker post as your template for marking/drilling your four rivet holes. The bit size is 3/16”, as are the stainless steel rivets you will use. Once you have drilled your holes, use a pop rivet puller to attach the striker post.

I used a consumer grade pop rivet puller which I would now highly recommend you NOT use. Look for a pro model that has longer handles that will provide you with more leverage. The consumer models are fine for aluminum rivets, but it is pretty tough to pull stainless steel rivets with them.


Heavy Duty Rivet Puller

Once your striker post is installed, thread the support wire through the solid post end and attach the ends to the corner castings using the provided nuts (see picture below). Tighten the nuts to the point that the wire has a solid thud, but don’t over tighten or you could damage your crossbar or corner castings.


Attach Dolphin Striker to Corner Casting

Jib Block Support Wire
The next thing you will need is a trampoline with special grommets installed to allow two jib blocks to be attached through the trampoline to a jib block support wire that runs underneath the trampoline between the two sidebars. Unlike the Hobie 16, the jib blocks on the Turbo are on the trampoline rather than the front cross-bar (see picture below). I have seen H14 pictures with blocks rigged on the front cross-bar, but the typical setup is for the blocks to be on the tramp, attached to the jib block support wire.

The trampolines that Hobie Cat sells for the H14 have these grommets already installed. There are several places that sell aftermarket H14 Turbo trampolines (not class legal) as well.

Hobie Cat does sell a conversion kit for pre-1982 boats that includes grommets, (plus extended chain plates and the new length shrouds – see discussion below). You may also be able to buy the grommets and have them pressed into place at a tent and awning shop. See this pdf for placement: http://www.hobiecat.com/support/pdfs/e_turbojib.pdf
The jib block support wire attaches to the chain plates via a clevis pin on either sidebar and you tighten it using the turnbuckle until it’s tight, but doesn’t begin to bow the side bars (see picture below).


Jib block support wire

If you have a pre-1982 H14, the chain plates will likely not have the extension with the extra hole extending out from the frame and under the trampoline to attach the jib block support wire. If this is the case, you will need to drill out the old rivets holding the old chain plates to the sidebar and replace them by riveting in the new chain plates. You can get the turbo chain plates individually or a part of the Turbo conversion kit mentioned above.

I had to replace the old chain plates and it was a pain because you have to remove the frame from the pontoon pylons in order to get enough clearance to drill out the old rivets on the underneath side of the sidebars. I would suggest you get a rubber hammer to assist in getting the frame off the hull pylons after you remove the pylon bolts. The hammer is also helpful in getting the frame back on the pylons. Don’t use a regular hammer or you may break your corner castings. Also, be careful when knocking the corner castings back onto the pylons. Hit them with your rubber mallet in several different places so that they go on evenly. When you get to the point that the holes line up again STOP! If you keep pounding, you will damage the setting of the pylons inside the hulls and you will see a bulge in the sides.

Once you have the jib block support wire in place, the blocks attach through the trampoline grommets to the jib block support wire using small shackles (usually included with the blocks).


Jib block installed on trampoline

Cheek Block and Cleat
Next, you need to attach the cheek block and cleat to the lower right side of your mast (as you face the mast from the front of the boat – see picture below). Again, use your cheek block and cleat as your drilling template. These too will require 3/16”stainless steel rivets, but the rivets for the cleat are longer.

You can also tap holes and use fine-threaded bolts for the cleat if you can’t fit the head of your rivet gun inside the cleat (flush with the head of the rivet), but you should be able to use rivets on the cheek block. (Note: you may find it more comfortable to install the cheek block and cleat on the right side if you are right-handed.)


Cheek block and cleat

Note that many rivets do not provide a water tight seal. I was lucky because Dan gave me a number of rivets that had a closed or cupped end or sleeve, so that when you pull them, they seal. If you can find these rivets on the web, they are much better because the last thing you want is a leaky mast when you capsize. Your Hobie dealer should have the separate sleeves to use with the open-ended rivets. If you can’t find any, you will want to seal all rivets with silicone.


Cleat with rivets and sleeves

Jib Halyard Rig
All wire rigging for the jib halyard setup can be “manufactured” at a West Marine store or purchased custom from a sailing shop that makes rigging. At West Marine, they won’t swage the cables for you due to concerns about liability (should you dismast), but you can make them up yourself. Use two sleeves on each thimble to ensure a tight connection and reduce the chance of your rigging coming apart. All cable lengths listed in this article are the finished length measuring from thimble end to thimble end.

The halyard block and downhaul block can be purchased from Hobie Cat. I listed the blocks from the H16 in the parts list. These are a little pricy, so look on eBay for a used H16 Jib Halyard rig with these included. If you buy the H16 Jib Halyard rig, you could also modify the H16 cable lengths to work on your H14.

The upper forestay or pigtail consists of a 1/8” 1 X 19 wire, 8” in length with thimbles on both ends. One end attaches to the mast tang via the shackle (along with your shrouds, trap wires, etc.) and the other to the jib block assembly on the jib halyard block using a clevis pin and cotter pin.

The lower forestay consists of a 1/8” 1 X 19 wire, 13’ in length with thimbles on both ends. Note that this 13’ length is for using two 7-hole adjusters (discussed below). You will want to add about 6” to the length if you only use one 7-hole adjuster.

The lower forestay attaches to the bottom of the halyard block using a clevis pin/cotter pin and then to the 7-hole adjuster using a clevis pin/ring ding.
The full halyard consists of a wire halyard made of a 1/8” by 7 X 19 cable, 11’ 8 ½” long, running through the halyard block with a thimble and shackle on one end (for attaching the jibstay wire) and the other end with a thimble that is attached to the downhaul block. Note: this must be attached to the downhaul block at the time you make the halyard wire. The downhaul block then has the jib halyard line tied to it. The halyard line is 27’ 6” in length and 3/16” in diameter.


Little 16 jib Halyard setup (cable lengths not to scale)

Bridles
The bridles attach to the 7-hole adjuster using a bell shackle as they do in a unirig H14 setup. The turbo bridle wires are 1/8” 1 X 19 cables, 3’ 10” in length with thimbles on both ends. Note you don’t want to buy the Hobie Cat stock Turbo bridles because they have one forked end to attach to a jib furler.

Using Two 7-hole Adjusters
Rather than use one 7-hole forestay adjuster, Dan suggested I use two adjusters connected by a clevis pin with some tightened bungee cord between the two. When the lower forestay becomes slack as you hoist the jib, the bungee pulls the top 7-hole adjuster and lower forestay forward and away from your jib. This helps keep the lower forestay out of the way and protects your jib from excess rubbing. See illustration below.


Two 7-hole adjuster setup (cable lengths not to scale)

Jib
Hobie Cat sells the class legal jibs, and you can also get used ones on eBay. Its worth looking because this is one of the most expensive items on the parts list. There are also aftermarket jibs (not class legal) sold by a few suppliers. There is at least one supplier that lists H14 jibs on eBay as well.

Jib Sheet / Clew Blocks
You’ll also need a jib sheet along with two jib clew blocks and a shackle for attaching to the clew of the jib. The jib sheet is 5/16” and 32’ long. See diagram below for how to run the jib sheet.


Shrouds
The shrouds measure 15’ 3 ¼”. If you have a pre-1982 H14, the shrouds may need updating to the new length. I was able to use the shrouds on my boat as they were the correct length. Hobie Cat does sell shrouds of this length separately or in the Turbo Upgrade Kit (along with the chain plates and trampoline grommets). These often can also be found on eBay.

Trapeze Setup
Trapeze wires measure 13’ 5” each. You’ll need a set of two, plus two dogbones, two adjuster lines, two rope locks and one shock cord to attach the adjuster lines and runs beneath the trampoline (see picture below).


Trapeze rig

Rigging Instructions
See this helpful pdf showing how to rig a Hobie 16. The same principles apply to rigging your Little 16 jib setup.

http://www.sailtoronto.com/PDF/Hobie%20Rigging%20Basics.doc

Dan advised me that you want to have the full load of the mast on your jibstay so that it is rigged tight. Also, the lower your jib on the 7-hole adjuster, the better. I attach mine to the shackle that connects the 7-hole adjuster to the bridles using a twist shackle Dan included with the parts I bought from him.

The final product is shown below. Happy sailing.


Finished boat

Other helpful hints from Dan:
I added a bungee to the mast that keeps the jib sheet from fouling. Simply tie a bungee around the front beam near the corner casting, run it through the existing halyard cleat (front center of the mast) and to the frame on the other side. Make sure this bungee goes under the jib sheet.

I also found that you want the jib to be attached to the bridle/forestay connection as low as you can get it. I used a twist shackle attached to the shackle that connects the bridles and forestay.

The jib clew plate has several holes in it. Based on the rake of your rig, you need to adjust it to find a sweet spot. Move the shackle (that holds the clew pulleys) up and down the plate until you get even tension on the bottom and back of the jib. This will give you a better sail shape and keep the sail from flapping.

A few advanced helpful hints from Dan:
A Hobie14 sails much better with a very raked-back rig. There is a lot of discussion on this topic on many of the forums, but I will give a brief synopsis. You typically want to have your mast raked back so far that when going upwind, your main blocks are block-to-block—and that is using the low-profile 2.25” blocks. This requires you to have adjustable upper rudder castings so that you can rake your rudders under the boat to compensate for the mast rake. This makes a Hobie 14 very fast and gives it less tendency to pitchpole. You will find that you sit farther forward and when you trapeze, your feet are right at the sidestays.

When I rigged my 14 with a jib, I found that it sailed much nicer with slightly less rake and a tight rig. I couldn’t get the jib to tighten properly, but when I moved the rig forward by moving the sidestay pins up, the angle moved it onto a better position. This is something you will have to adjust until it feels right for you.
Here is a table of all the parts numbers, cable lengths, 2008 prices, etc. Click to make larger.

Friday, February 13, 2009

Introduction


This blog is about sailing catamarans in the Midwest. I am starting it because I love sailing - not just being out on the water, but also the technology, the gear, and the people.

The blog will be a mix of sailing experiences, how-to's, and product reviews. I will also add my favorite sailing links including other supplier web sites, sailing blogs and cat sailor forums. It's my hope that this blog will bring together all the resources that I'm aware of to aid someone wanting to sail in the U.S. Midwest.